In this article, I will show you how to use Microsoft SQL Server in Talend Open Studio. So let’s get right to it.
What is SQL Server and what will we talk about here?
First of all: What is Microsoft SQL Server? Well, it’s a relational database. And it’s embedded in the Microsoft world, so you can use it with Visual Studio, PowerBI, etc. You will find more on the link here below.
But now we’re going to talk about: How to use Microsoft SQL Server in Talend? So we’re going to look at two big things.
1) One is how to create the SQL Server Connection, specifically with the open source JTDS driver, because the Microsoft driver can’t be included in Talend Open Studio out of the box,
2) and then we’re going to look at the different components. Here we can create SCDs, we can do bulk loading, we can get the last inserted ID, and many things more.
In our example we’re going to use the connection component, rollback or commit, the close component and the output component itself, to write data into the database. So this is what we’re going to look at now in demo time.
Create Database Connection to Microsoft SQL Server
Here in Talend, to define the connection to MS SQL Server, I go to „Metadata“, to „DB connections“, I right click and I select „Create Connection“. I give that the name Ms-SQL-server, and then go to „Next“ and select „Microsoft SQL Server“. For the database version you have two choices. You can use either the Microsoft driver, but this library that can’t be included in Talend out of the box, because of licensing reasons. So it’s easier to choose „Open Source JTDS. And now I’m providing my information here to connect a the database.
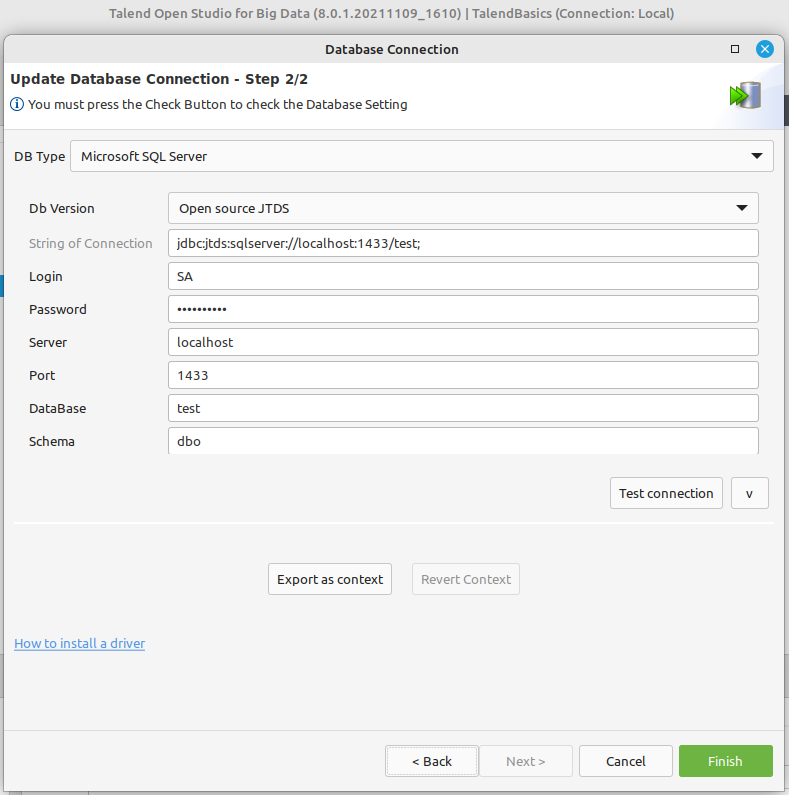
In case there is anything wrong, I will get the option to show the details. Here it would say unknown server-host name, so this would indicate what you should do, in order to fix that. Once you have it, you should get this message. You can click on „Finish“. Now here is the connection. I want to use that in a job.
Steps in the Demo Job
We have a few simple steps. The first sub-job is to establish the connection. Here at the end we will close the connection again. And here in the middle we’re loading a CSV file, outputting this to the database. And only if everything is okay we do a commit. If something goes wrong, we do a rollback.
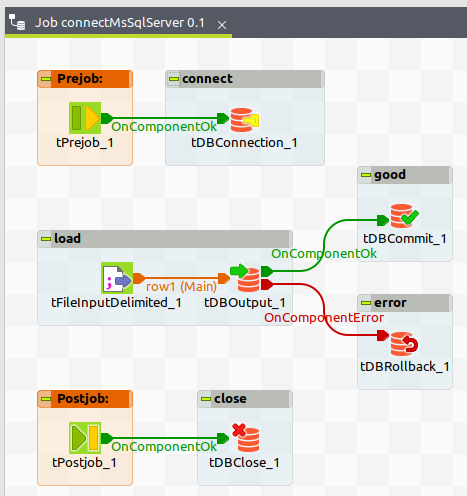
Microsoft SQL Server Components
Then for the components, here we can see in „Databases“ and „DB Specifics“ what ones we have available for MS SQL. But we’re going to build something like this. So let me close this one again and not save the changes.
Building the Demo Job
We have to create a job for this. So right click on „Job Designs“ and let’s call that „MsSQLServer“. I will add a tPreJob component and place that here on the top left. Now I drag and drop my database connection into the job and convert it into tDBConnection component. Now this one is fine. It has the connection information already. From tPreJob right click and select „Trigger“ → „On Component Okay“, connect it here to this one.
We can now click on „Run“ and see if this part is working. It’s being able to connect to the database in this first sub-job.
Now the other way around, I want to do after processing everything in my job. This means I will add a tPostJob component and a tDBClose component. The tDBClose component you won’t get if you drag and drop this connection into your job. Just being in the designer here, in the central area, you can start typing „dbcl“ and you will also find that. Just select it and hit „Return“ on your keyboard to insert it. Here in component we have to select in the „Database type“, which is „Microsoft SQL Server“. Hit „Apply“ and then also tell it which connection to close, which is tDBConnection_1.
Then for this to recently happen after everything else is processed, we have to connect this like above. Here with the „On Component Okay“ trigger to tPostJob component. So right click on tPostJob, select the trigger „On Component Okay“ and connect it to tDBClose component.
We are on the next step ready to run this job. So I go to „Run“ and hit the „Run“ button. We can already see here in the interface and in the console, we don’t have any error message. Here we have OK and here.
The Sample File
Now it’s time to take the file that we want to load to the database, which is a simple CSV file with a header that has three columns. A store name, a date and a sales amount. And then the corresponding rows, where the date is this part here in the middle and the values are separated by a comma.
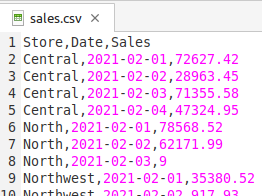
So this is what we’re going to have in mind, when we define this now in Talend.
Definining File Metadata
Back in Talend, we will define this CSV file by right clicking here on „File Delimited“ and select „Create File Delimited“. We give that a name. For example „sales.csv“, just like the file. We browse for the file. Now at this stage we get a preview of the file content.
We just go to „Next“ and we can see it’s not yet parsed the way we want. We have to adjust something here by defining the comma as a separator. In the 2nd step defining this first row as a header. So how to do that? Here for the „Field Separator“ on the top left we select comma. And we can hit „Refresh Preview“, so it’s splitting it up into three columns already. One more thing we can do here now. It’s just check this box „Set Heading Row as Column Names“. Then we will have nicer column names instead of column 0, 1 and 2. Here again hit „Refresh Preview“. This is it already.
Define the File Schema
Now in the last step, we have to define the schema. Here we have to pay attention to what we actually want, because we also need that for the creation of the table. For the „store“ it’s probably fine to leave that as a string and nine characters long. For the „date“ it should be of date type, but here we want another pattern. We have year dash, a two digit month, a dash, and two digit day. So we define this one.
How to do this easily? You delete the pattern you already have. Then you use „Ctrl“ + „Space“. So here in this field for the date column, „Ctrl“ + „Space“ and then select one of the patterns that helps us with this one, which is here the fifth from the top. Now for the „sales“ I select double and eight in length, but a precision of two, because we only have maximum two decimal places. And this is fine, so I can just hit „Finish“ here. And we will now be able to use this in our job.
Using Delimited Metadata in the Job
Drag and drop that into the centrol area. Convert it into tFileInputDelimited. I first want to see that here on the console to verify if the definition is outputting the data the way I think it should be, before we actually load it to the database.
For this we will use tLogRow component. Left click in the Designer and writte „log“. When it’s selected, hit „Return“ on your keyboard and then you just need to connect sales.csv to this tLogRow component. For this tLogRow component, we can switch that to „Table“ mode, so it will nicer printout to the console.
Now we’re ready to run this job again. That’s pretty good already.
Adding The Database Output Component
Now again, we will take the connection and convert it to a tDBOutput component, which means writing to the SQL Server database. So drag and drop that again into your job, convert it to tDBOutput. Here from the tLogRow component, connect it to MS SQL Server component.
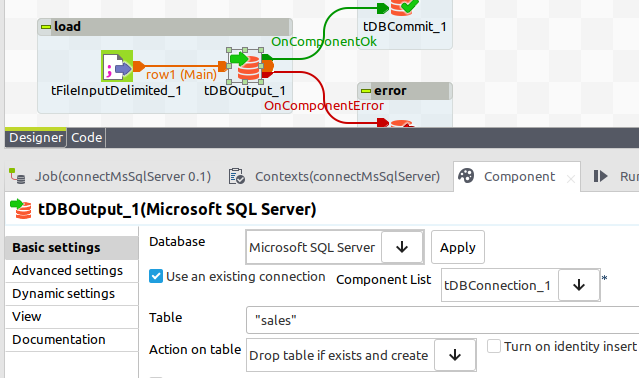
Three things we have to do here. We can check „Use an existing connection“. This is also why we defined a connection here before. Then we have to provide a table name. Let me just call that „sales“. And in order for us to be able to run this several times, I will just select „Drop table if exists and create“.
Adding tDBCommit and tDBRollback
Now if we’re using this tDBConnection component and this tDBClose component, we have to do either an explicit commit or rollback. So this is one more thing we have to add to our job.
Being here in the central editor, I just type „commit“ and we will find this tMsSQLCommit component. I will also type „rollback“ and you will find tMsSQLRollback component. I move those a bit closer to the tDBOutput component, that we have here.
It’s showing another label, but you can see here in „View“, we can change that. When I use this parameter placeholder __UNIQUE_NAME__ here. Then it’s actually tDBOutput_1.
We want to commit the data in case everything in this component is fine. In other cases we want to roll back. So on this is tDBOutput component, I right click and select the „Trigger“ → „On Component Ok“ to go to tDBCommit. Again right click on tDBOutput component, „Trigger“ → „On Component Ok“ to go to tDBRollback.
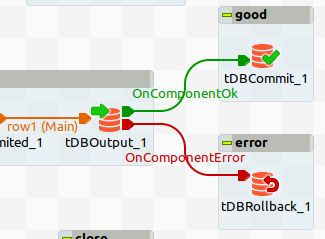
In the commit and rolback component, we have to select which connection to use. And we don’t need to close the connection directly, because we actually already have this explicit tDBCclose in the last step of our job. This is all we have to do.
Running The Complete Job
We run this job again. Now will see the data on the console. We can leave this component here, but just deactivate this and the job would still work. This is one of the nice features of tLogRow component.
Now we should be able to verify that the data is in the database.
Fixing The Data Types
But for MS SQL Server I have a problem with this default data type mapping. Let me just show you what I mean. Now we have a „date“ which also seems to have a time and even milliseconds part. Even worse for the „sales“ column. Here we not only have two decimal places. If we compare this to the file it does not really look like it’s matching.
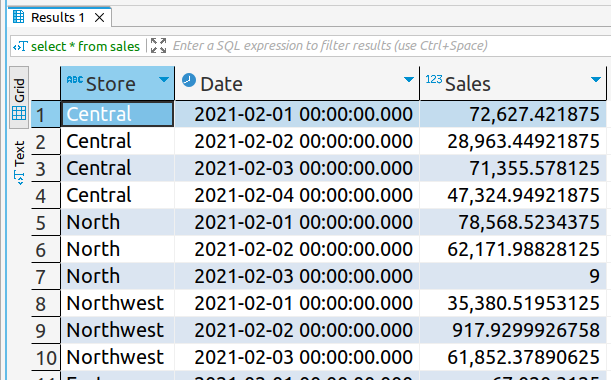
So this is what we’re going to fix now in our Talend job. In this tDBOutput component go to „Edit Schema“. First of all for the „DB Type“ for the date column, we’re going to select DATE and here I want to have DECIMAL. The other things are fine.
Get The Final Result
I defined here „Drop table if exists and create“, so I can simply re-run this job. We should now have the correct data in our database, which we can confirm by re-running this
SELECT * FROM sales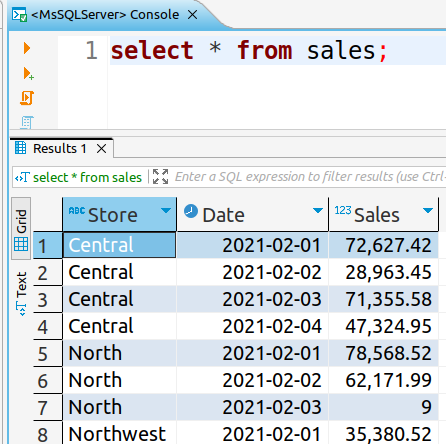
There we see we have the data the way we intended to load it. And that’s pretty much it for the demo.
Summary
So you have seen:
1) how to use Microsoft SQL Server in Talend Open Studio using the JTDS driver,
2) you’ve seen how to build a simple job,
3) and what components are available
Learn More: Complete Talend Course
If you not only want to know how to use Microsoft SQL Server in Talend Open Studio, go to my Udemy Course. This is a comprehensive training for using Talend to build data integration jobs, not only for Data Warehouses.
Video Version of this Article
Thank you for your attention and see you soon!
Read other articles.
