In this article I will show you joins in Talend Open Studio. This works for many data sources, not only for databases. First we’re going to look at what joins are possible to implement, then we’re going to look at the sample data, and then we’ll implement this in Talend.
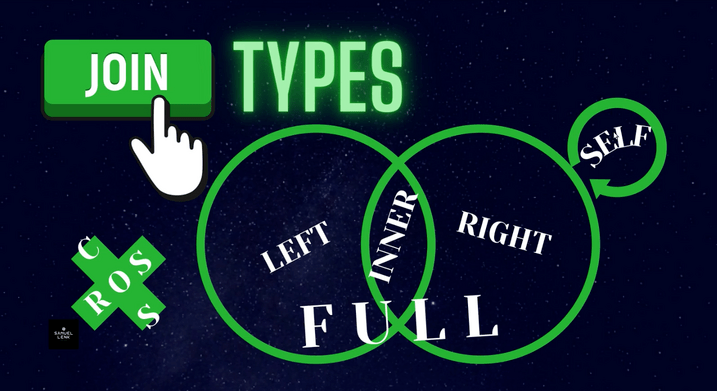
Join Types
The types of joins that we’re going to use are the ANSI standard joins, which is cross join, left outer join, right outer join, inner join, and full join. Plus the self join, which is a non-standard one. We’re going to use an inner join to implement a self join.
Sample Data Set
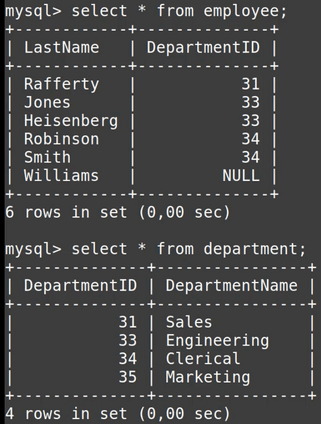
So have a look at our data set. Here we have two simple tables. An employee table with some LastNames and DepartmentIDs. You can already see here one has NULL.
Then we have a department table, with DepartmentID and DepartmentName.
Also here the last line has no employee assigned to it. That’s the data we’re going to use for the example.
For the self join it will be slightly different, but you will see when we get there.
Building the sample job
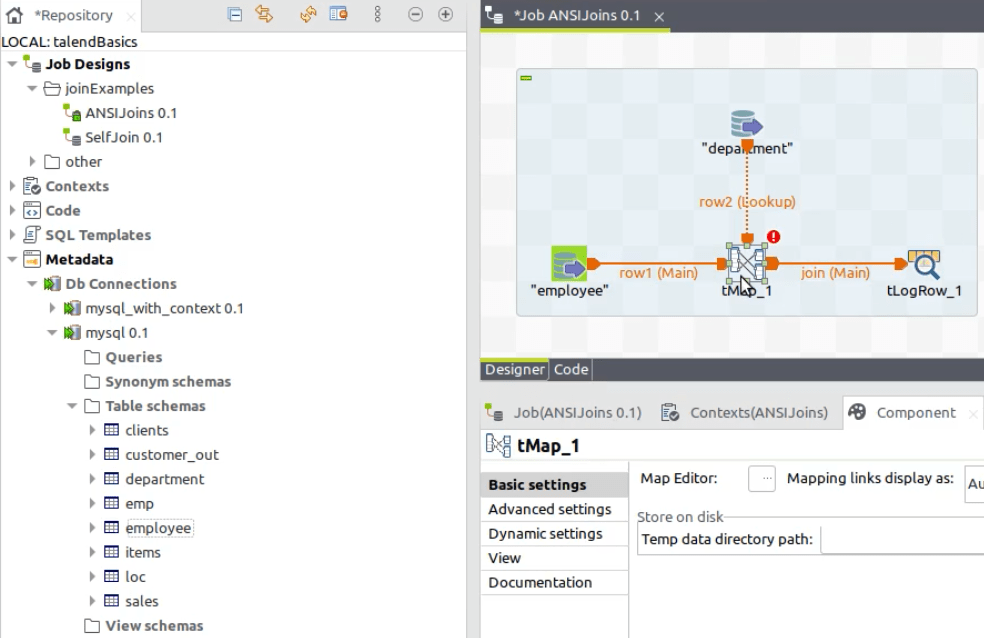
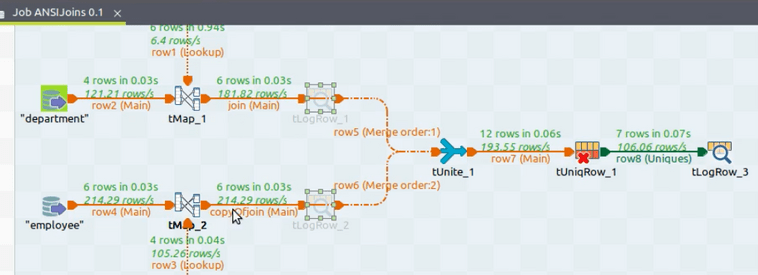
So let’s head over to Talend Open Studio. I already got an empty job open. Besides this I’ve got a database connection in metadata. For this database connection I already retrieved the definition of the two tables mentioned before. So I can use them directly with drag & drop to convert each of them into a tDBInput component.
This one here goes to the left and this one at the top, because this would be the left side of our join and this will be the lookup.
The join will be done in a tMap component and the output will go to the console, using a tLogRow, although it could be any other target. The console output is switched to table mode, so it’s easier to read.
Now we connect the components. First the tDBInput for the employee table. Then the tDBInput for departments.
For the output of tMap we have to give a name. So I call that join and click ok.
Setting up the join in tMap
And in tMap we will now define the respective joins. To do this I open the tMap editor by clicking double clicking on its icon.
Cross Join
First I want to do a cross join. So from the main input here, which is called row1, I drag & drop these two columns to the output. Now let’s take the other two columns and insert them below this. That’s the mapping we have to do for the cross join.
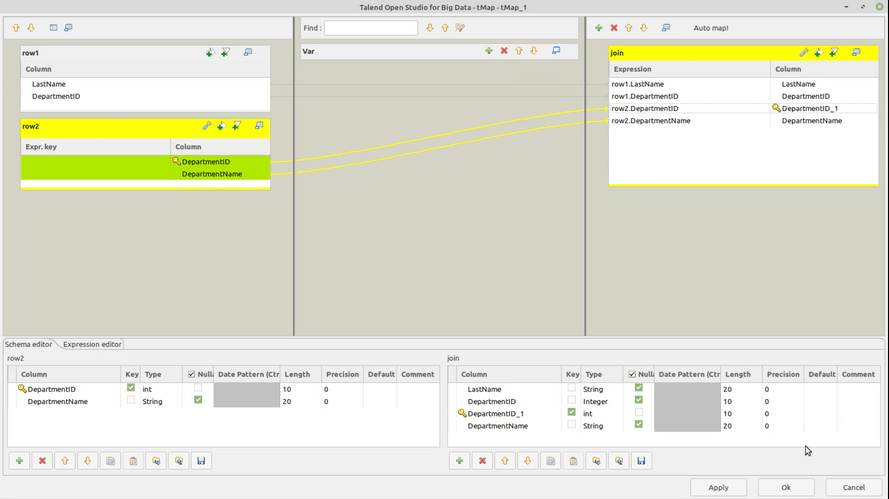
We propagate the changes, because this output did not have any schema before.
Now we can run the job to see the result. Here we have six employees and four departments. You can verify on the console that each employee is combined with each department.
That’s it for the cross join.
Left Outer Join
Now we will do the left outer join in Talend.
First of all, we have to look for the column that we have here, that we can match to any column in the lookup. It’s the DepartmentID.
So just drag & drop this to the corresponding column in your lookup. Now you have to make sure here in tMap settings, that you use the correct join type. This is by default left outer join. So this is fine.
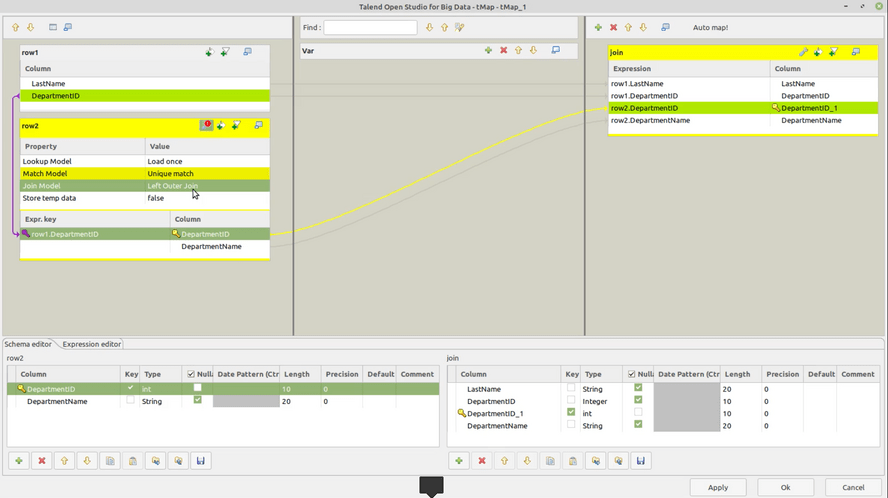
Now I can click OK and execute the job. We can see that also six employees are going to the output, to the console. And that’s it for the left outer join.
Inner Join
The next type is just changing this setting here to inner join. So when we’re looking at how the inner join works, that’s the only change we have to make.
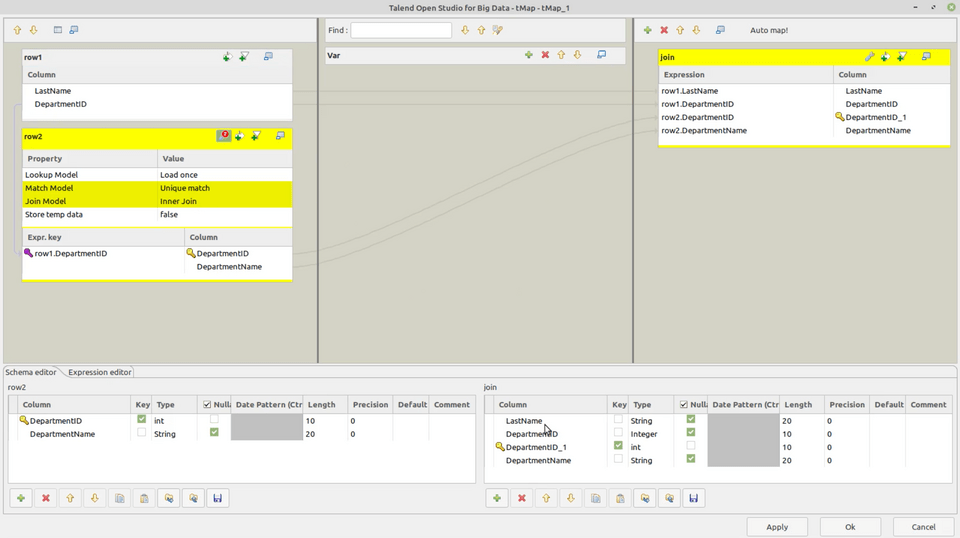
We can see that there is now one row less in the output, because the employee that did not have a department doesn’t show here anymore.
There’s a really cool feature to identify inner join rejects, which means those that are not resolved by the inner join here. I will show you that at the end.
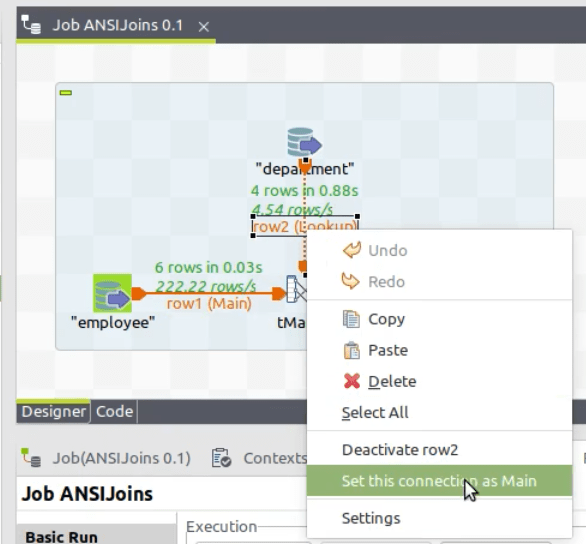
Right Outer Join
Now let’s go ahead and look again at the mapping here. We just did the inner join. The next one would be to do a right outer join.
This is achieved by doing a left outer join, but with reversed input order. What do I mean by that? The employee table has to become the lookup and the department has to become our main input.
To do this, I can right click on the connection and select the option set this connection as main.
Once done, I’ll move that around a little bit, so it looks nicer again. Just like before.
Now we go back to our mapping. We have to connect those two columns again, that have the corresponding identifier. And here it’s okay again to have left outer join with the reversed input order. This means we are now creating a right outer join.
One more thing we could do here, if this is desired, is instead of unique match we could take switch to all matches. So that will give us several entries for some departments from our lookup.
Again we can run this job and see the result.
Full Outer Join
Next comes the full outer join in Talend. This is done by doing a left outer join and a right outer join, but then getting rid of the duplicates.
So how exactly can we do that? Well, just copy & paste this sub-job here and move it further down.
Again here we do what we had before, by setting this connection as main.
Then you can re-arrange the components to have a nicer layout.
In this tMap we re-create basically what we already had for the left outer join.
So we at least check if we got this connection between the DepartmentID columns.
We should have the join type left outer join here, which would now again really be the left outer join.
So this one here is now the left outer join and this is the right outer join.
Up to here we can execute this again. So we will see the corresponding results on the console. Now we see the marketing department, where no employee is assigned. And here we see Williams, the employee where no department is assigned. That’s fine so far.
Eliminate duplicates in Full Outer Join
The next step is to put this data together. We’re going to use a tUnite component. It works by just taking inputs of the same structure, and bringing them together.
So we connect this one as well as the other. This component now has an error here. It says no schema is defined. We get rid of this easily, using sync columns here.
Now we use a tUniqueRow component to eliminate the duplicates. Here we simply use this one setting: We select the combination of all columns to be the key attribute.
After this we also add a tLogRow component at the end. This will show the final output.
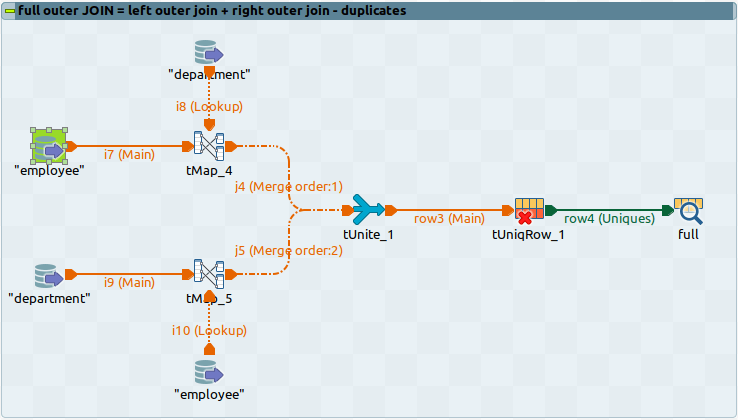
Then we can also deactivate the other two tLogRow components.
Result of Full Outer Join
I re-run the job. We can still see the amount of processed rows here. It’s six and six. In sum it’s 12, but after eliminating the duplicates, you can see it’s seven.
What do we have here now? We have the ones that are in the inner join, which are the first five rows.
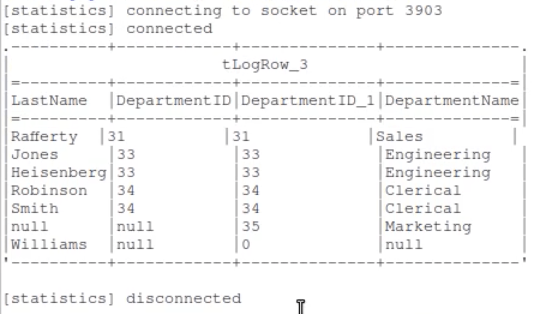
Then we have from the right outer join this department and from the left outer join this employee.
That’s all the ANSI standard joins, the five types that we wanted to look at.
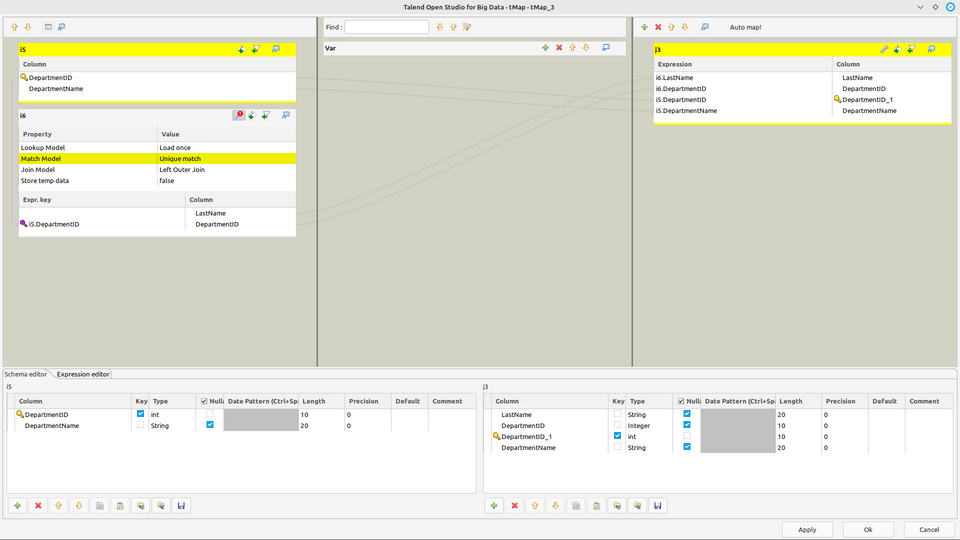
Self Join
Now the last thing I want to show you is the self join. We’re going to the self join here in form of an inner join.
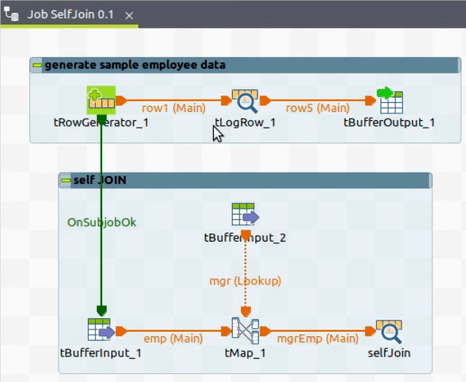
So I open this tMap component to show you exactly how I’m doing this.
Here we’re having some employee data, which is similar to what we already have. Each employee has an ID, Name, and a ManagerID.
The ManagerID points to the ID column of that same dataset here. So this is also how I did the lookup definition, by pointing to emp.ManagerID for the ID column here.
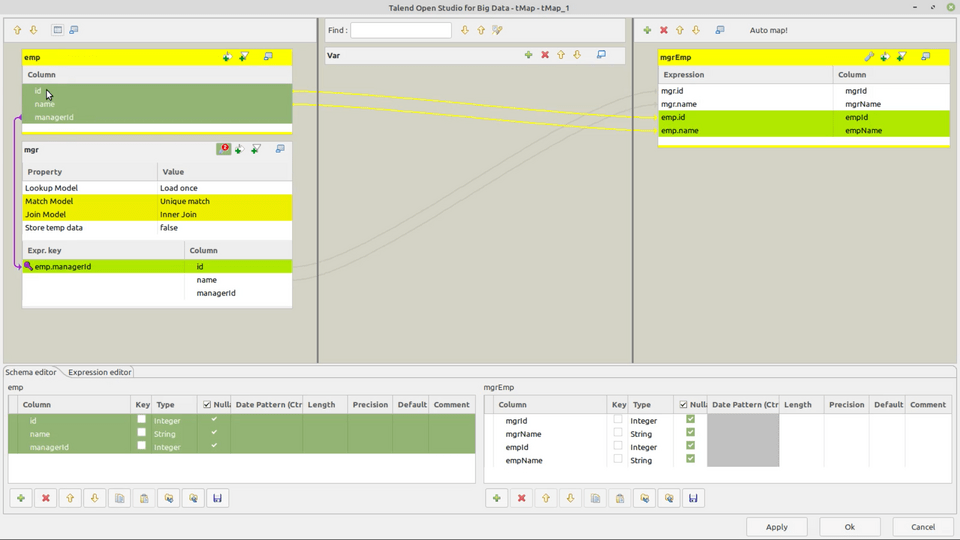
So the person I find then, with this lookup, is the manager of the respective employee. And we output the manager’s ID and Name plus the employee’s ID and Name.
The type of join is an inner join. And I click OK to just leave the mapping.
What am I doing above here? In this sub-job I’m generating the sample data. We will also show this on the console, before writing this data to memory.
And then down here, we’re using tBufferInput to read this data again twice. And you have already seen the mapping for this join.
So let’s execute this job. Here we have some rows with NULL and zero as well.
This means that in the self-joined data we respectively don’t get them, when doing an inner join.
Getting Inner Join Rejects
But I also promised to show you one cool trick to those unjoined rows. So what you can do here in Talend is outputting the inner join rejects.
For this I added a new output and called it joinReject, in order to distinguish it from this other output. Then from tMap you create a new output and connect it to this new tLogRow. Then confirm to get the schema of the target component.
So in tMap we can already see those four columns in the new output. But it has no connections yet to any of the columns on the left.
First we will assign the corresponding values. To do this, I connect each column until it has the same connections as the output above.
Now for this to only capture the rejects, we have to go here to tMap settings for this output and set the option catch lookup inner join reject to true.
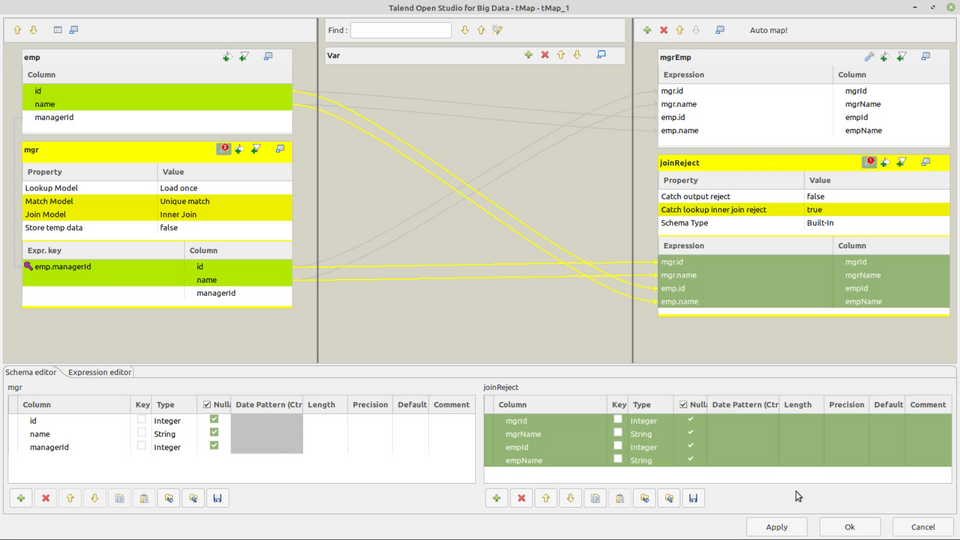
When we re-execute this process, we have three console outputs. The first one is the original data, the second one is the self joined (aka inner join) result and finally the inner join rejects with the corresponding employees.
And that’s all for the self join part.
Summary
So you have seen:
- the different types of joins,
- an example of each join in Talend – for any source and target system,
- and how to get inner join rejects easily
Learn More: Complete Talend Course
If want to do more things like this and integrate your data esaily with Talend Open Studio, go to my Udemy Course. This is a comprehensive training for using Talend to build data integration jobs, not only for Data Warehouses.
Video Version of this Article
Thank you for your attention and see you soon!
Read other articles.