In this article, I will show you how to work with Vault in Talend.
What is Vault?
First of all, what is Vault? Well, it’s a secure storage for sensitive data like tokens, passwords or encryption keys.
And it offers a wide range of tools to access this data and manage it.
If you want more information on this, please go to vaultproject.io.
Using Vault Credentials in Talend Jobs
Here in this article, I’m going to show you how to use credentials from a Vault secret in Talend, by using the REST API in a tRestClient component.
For this we’re going to build a demo job in Talend.
Getting The Parameters from the Vault web interface
First of all, here in the web UI, I sign in with my token, so I get the storage here, which is in this secret storage engine that can store key value pairs. If I click on that, I can see one secret I already defined for the demonstration purpose.
And if I want to create a new secret, I can just click here on the upper right side, give it a name or even a path.
For example, let’s say an environment, like “dev”, then a customer, let’s say “Acer”, and then a description, for example, “db-data”. So it does not have to be just a plain name.
And then here I can define key-value pairs and add more and more and more to this.
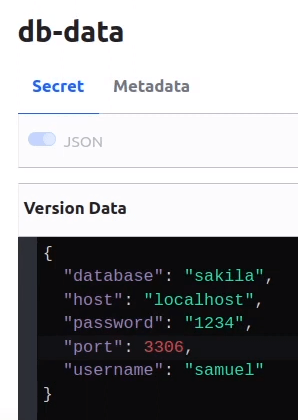
But I did that already and I want to read a simple one here, which is this “db-data” secret. Here you can see the contents in JSON format. When you define a new one, by the way, you can also directly go to the JSON format.
Let me just put two letters here and then switch to JSON. So you can see I can also directly type it out here.
But this is what we’re going to use, this secret that I already have. It’s called “db-data”, and it’s got this information.
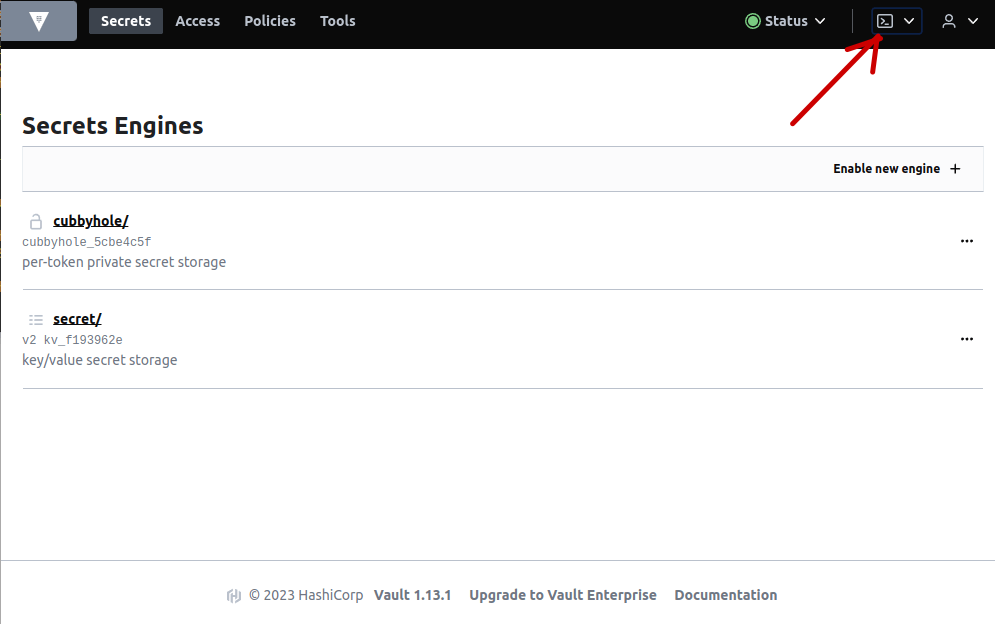
For the endpoints, that we’re going to use in Talend. They got a nice explorer of their endpoints here integrated in their UI.
You can get there by going to this terminal icon here on the top right of their page and then just write “api” here in this box and hit return. Then you will get to this.
Let me minimize the terminal again.
For the different categories, you can minimize them by clicking on them and see the corresponding endpoints. The endpoints that we’re interested in, or one of them, is here in the “secrets” category, which is the GET request for this one:
/secret/data/[PATH]where you replace [PATH] with the path to the secret itself.
And there you can already see a short description. If you click on this, you will see more.
I can also try it out here, which is really good, because it gives me all the information that I need in order to be using this in Talend.
So I click on “Try it Out”. I just type my secret name or my path, which is only in the name here and hit the “Execute” button.
Then I see the corresponding curl request that’s been sent here, the URL for the request and here the response.
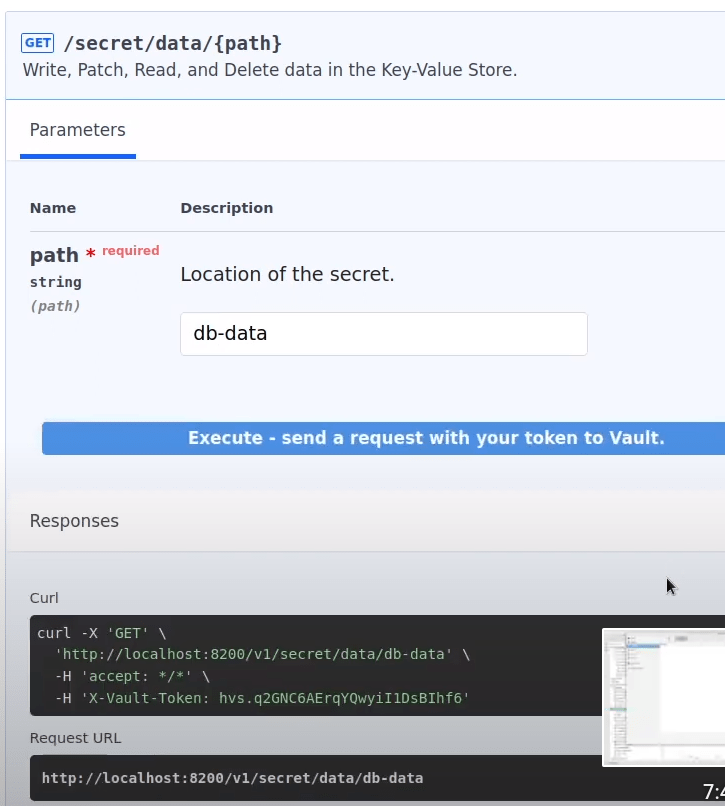
So the URL, this header information, and then the response, in order to parse it, is what we’re going to use in Talend.
For the response, it’s good to hit “Download” here and save this to your machine.
Building the Vault part of the Talend job
And with this we can head over to Talend and look at the job we’re going to build.
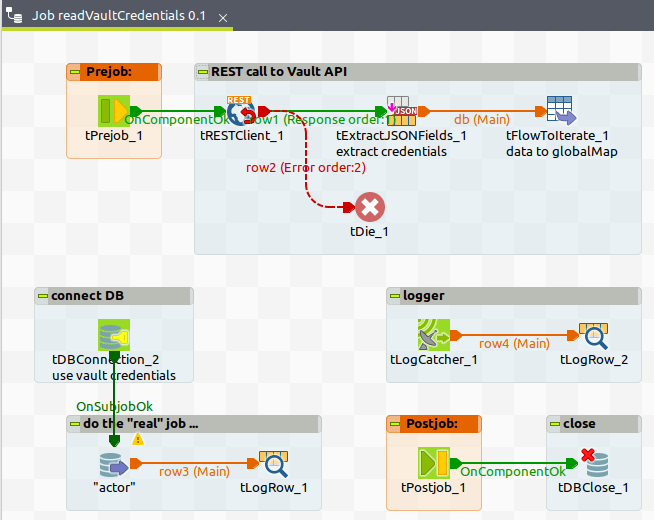
First of all, before we start processing data from the database and showing some things on the console, we’re actually going to read the database connection information here from Vault.
You can see these things come from globalMap, which is done with this tFlowToIterate component here.
But before we actually do the REST API call, with the API that Vault provides, with the corresponding URL that you’ve just seen in the web, plus the extra header here.
Now we’re extracting the information we need. You can see these five fields in order to be able to use them here to connect to a database.
And then we are doing some logging and at the end disconnect in order to have it complete. So this is what we’re going to build together.
So I create a new job. Let me just close this one and copy the name from here. On my folder “Use cases” I right click, to create a new job design.
It has to be a unique name. So I add a “2” at the end. And now let’s start with the tPreJob, tRestClient, and a tLogRow.
Configuring the tRestClient Component
Here, the trigger “On Component Okay” goes from tPreJob to tRestClient. And tRestClient now needs the URL to open, which is this one:
http://[SERVER]:[PORT]/v1/secret/data/db-dataSo I can copy the request URL from the web and just paste it here inside these double quotes.
I want to get JSON. So I select “JSON” as an “Accept Type” here. The schemas are fine so far, but for the advanced settings we should do two things. In my case, I don’t want an XML response, so I uncheck the box “Convert response to DOM object”. And I add a new HTTP header, which is the one that I’ve already shown you here in the web. So I copy the value “X-Vault-Token” here plus the token itself.
As always in Talend I paste it inside double quotes, in case you are using values directly. In other cases you could be using context variables or other variables.
Then the response I can connect directly to this tLogRow component. Then I copy and paste this component, using Ctrl + C and Ctrl + V, to get the other output here, which is “row” “Error” and connect it to this second tLogRow component.
Here I “Sync Columns”. And I’m ready to run this the first time. We can already see this works. So it’s finding this secret and giving all this JSON information here, just like we’ve seen in the web.

You see it’s actually one row with three columns and we already downloaded the file.
Defining the JSON metadata for the Vault response
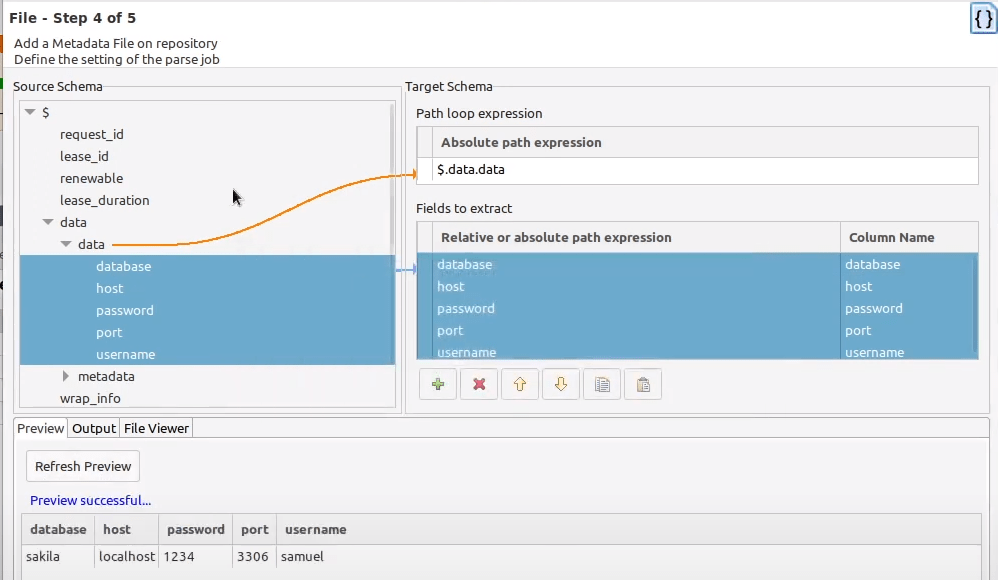
So we can take this file, that I already have locally, to extract the corresponding information from this piece of JSON.
How to do that? Here in “Metadata” in the “Repository”, go to “File JSON”, right click, and select “Create a JSON schema”.
Let’s call that “vaultResponse”. Like this. Then go to “Next”. “Input JSON” is okay here, because we are reading this JSON file. Now select the file, which is in my Downloads folder.
I don’t see it immediately, because per default “*.JSON” is selected. So select one of the another one and pick your file, then click “Open”. Here we already see the structure.
In “data” we can see our five fields of interest for this scenario. So respectively for the loop, we take the level above those five fields and then the fields, like database and username. We can hit “Refresh Preview” once this is done. And we see the information that will be extracted here. For the schema, I’ve got a really simple password, so I should change this back to “String” in order to avoid another extra conversion and can then click “Finish”.
Adding the tExtractJSONFields component using the JSON Metadata
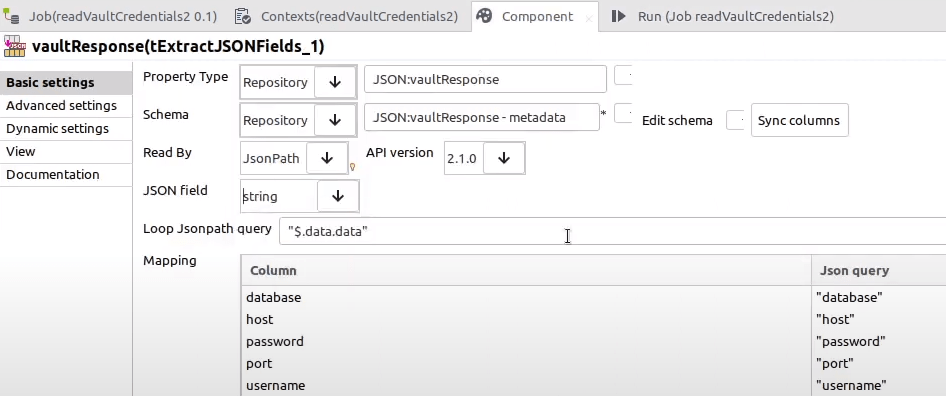
So for the response, I delete the response output and move this tLogRow over. Now I take this JSON definition “vaultResponse” from my repository, drag and drop that into my job and convert it to tExtractJSONFields.
Move that a bit in the middle here. The response now goes there. I don’t want to get the target components schema. So I hit “No” here. And then here just for the output, I use “Row” “Main”. And that’s it.
Then one more thing. I got to “Sync columns”, because this tLogRow component now obviously receives a different schema, which are five columns.
And here for the tExtractJSONFields component, we got to pay attention to which one is the JSON field. As you might remember here from this output, it’s the last column from the three that we get. So we can have a look here at the component. We have status code, body and string. It’s in “string”.
Now save this job, Ctrl + S. And execute it, F6 on the keyboard. And there it is.

We have the corresponding information. Now in order to be able to use this in tDbConnection component, we should somehow, some easy way, get it to globalMap.
Writing Vault Parameters to globalMap using tFlowToIterate
So we can use tFlowToIterate component for this. Just change the connection to this one and basically eliminate this tLogRow component.
And here, to make it even easier to know where we use it and how we use it and what it should be named, I rename this input to “db”. Because then when we use it, the actual variables in global map will be called “db” dot and then the column name for each corresponding field here.
For this output, I don’t want a tLogRow anymore, but I rather want a tDie. Because if I can’t find the secret in Vault, I would not even want to proceed to the database connection. So I change it like this.
Just connect the “error” flow to a tDie component. Also for the tDie component, in order to have some meaningful information, I would write a fixed string here, like ” Vault error:” and then concatenate the error message.
How can I do that? Also here the input name, for example, row2 dot and then the field “errorMessage” I can use for the tDie message.
"error reading from Vault: " + row2.errorMessageThen I can copy this, but just replace it here with this “4”. And instead of “message”, I write “code”.
Now I have the respective information. This type of stuff you would usually log to some place, be it a log file, a database, Graylog, or whatever.
Here, what you would want to do is use the corresponding Catcher component, which is tLogCatcher. In our case, let’s just log that again to the console, to make it simple for the demo purpose.
And you can see, here you can select a subset, but it should be at least “tDie”, because we have one tDie now in our process. But I prefer to leave the other two selected as well.
Adding other components for the ETL process
Now we need the tDBConnection component. We can either add it here and then configure it. Or if you have a database connection already, like I do, you can take it from the repository, drag and drop that into your job and convert it to, in my
case, tMySQLConnection or “t” + “whatever database you have” connection component. And now here I’ve got it.
I’ll change the values now for host, database, username, port and password. So I click into one of these fields. It’s automatically asking me if I want to update repository information or change to built-in, which means only changing it in this job, in this component. I switch to “built-in” property, and click “Okay”.
Now here I will retrieve the information that I have in globalMap through this tFlowToIterate component.
Retrieving Vault Parameters from globalMap
How to do that? Well, you can just type parts of the name, for example, the beginning, “tFlow” and then use “Ctrl” + “Space”.
Here you can already see the different fields, which is host for this field.
Again here “tFlow”, “Ctrl” + “Space” and then we have the database. Here the username. The port.
((String)globalMap.get("db.host"))And for the last one here, for the password, I first click on this three dot button, because as long as it’s showing these asterisks, it’s not writeable. Delete everything from this field here and also “tFlow” plus then select tFlowToIterator_1 dot password. It gets converted into this piece of code that we need to get the corresponding information.
Now in the next step, for simulation of some real processing, I’m just reading a small set of my “actor” table that I already have here, so I can drag and drop this into my job, convert it to tDBInput component.
Here I select “Use an existing connection”, choose which one to use and limit the query result a little bit, by only getting a subset of the data. I will add a WHERE condition. For example for actor.first_name I only want to see “Julia”.
Then this goes to the console, this database result. So it’s a “Row” “Main” connection here between tDBInput and a tLogRow component.
Adding the Necessary Triggers
Then this one should be ready and finished without errors, before we start this sub-job here. So right click, “Trigger” -> “On Subjob Okay” from this one to this one. And last but not least, we will add a tPostJob and a tDBClose component.
And the only thing here, we have to select the corresponding database type. MySQL in my case. Then pick the component.
Now we only need the “Trigger” -> “On Component Okay” from tPostJob to tDBClose.
Executing the Complete Job
And now I’m ready to execute my job again.
We can see, now we’re getting the information from Vault, establish the database connection with the data extracted from Vault, then doing whatever we have to do in our actual ETL process, and finally closing the database connection.
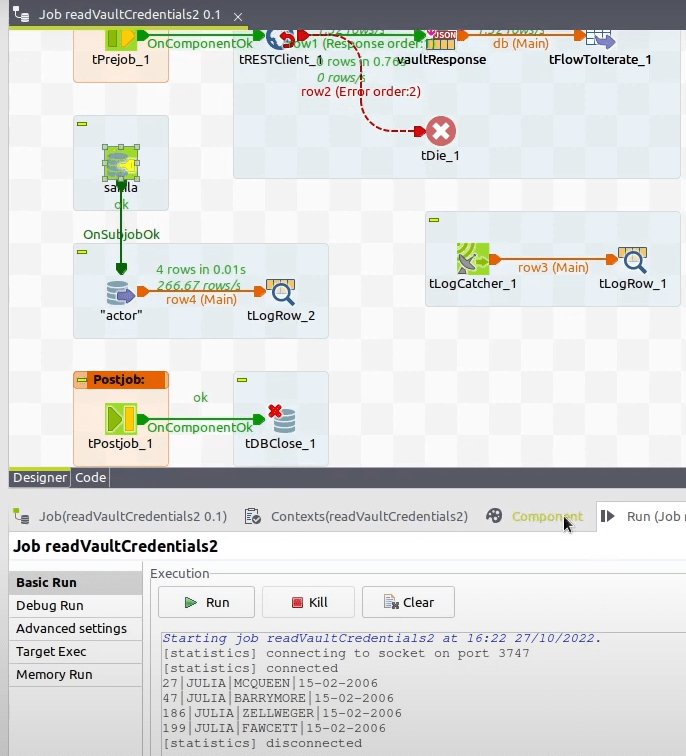
In this case there was no tDie, tWarn or Java exception. So this one doesn’t write anything to the console.
Summary
Most importantly we have seen:
- how to invoke the Vault API in a Talend job,
- how to get this information in the first place,
- and how to parse the answer from the REST API from Vault
- before we finally used those parameters to actually do some ETL processing
This way we are be able to get and use Vault secrets in our Talend jobs.
Learn More: Complete Talend Course
If want to do more things like this and integrate your data esaily with Talend Open Studio, go to my Udemy Course.
This is a comprehensive training for using Talend to build data integration jobs, not only for Data Warehouses.
Video Version of this Article
Thank you for your attention and see you soon!
Read similar articles here.